Disebabkan pagi tadi tuto Beeha untuk ajak korang check berat blog tu tak menjadi, so I dah moved on!! * ayat klishe orang putus cinta jaa.
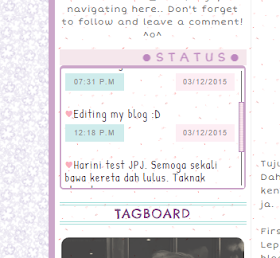
Actually, I have a lot of designs for status box in blog. But now, I just make the first tutorial for status box. Just simple and nice. *I think so. After this, if ada kelapangan I will share it to you later. All rite?
Jom tengok contoh macam mana status box yang Beeha maksudkan...

*perkataan status tu sebenarnya bergerak yea.
Now, lets begin our tuto.
First of all, simple things you have to do is Sign In you blog my dear. Then , go to your dashboard.
Copy this code
#t3 {
text-transform: ;
background:#F5E7EC;
font-size: 16px;
font-family: Short Stack;
text-transform:uppercase;
padding: 2px;
text-align:center;
letter-spacing:5px;
font-style:bold;
color: #BD88BF;
margin-top: 10px;
margin-bottom: 0px;
}
#status{
width:220px;
text-align:left;color:#3E313F;
font-family: 'Patrick Hand', cursive;
font-size:14px;
height:140px;
padding:5px;overflow:auto;
background:url(http://i.imgur.com/5Dy51.png);
margin-top:0px;
border-top: 4px solid #CCA7CA; border-left: 2px solid #CCA7CA; border-right: 2px solid #CCA7CA; border-bottom: 2px solid #CCA7CA;
border-radius:5px;
}
.icon{
color: #FAAFBE;
}
.icon:hover{
color: #AFDCEC;
}
.time{
color: #888;
font-family: 'Kite One', sans-serif;
font-size:9px;
text-align: center; letter-spacing: 1px;
display:inline-block;
width:60px;
padding-right:7px;
padding-bottom:3px;
padding-top:3px;
padding-left:7px;
background:#CFECEC;
}
.date{
color: #888;
font-family: 'Kite One', sans-serif;
font-size:9px;
text-align: center; letter-spacing: 1px;
display:inline-block;
width:60px;
padding-right:7px;
padding-bottom:3px;
padding-top:3px;
padding-left:7px;
background: #FDEEF4;
}
For blog skin user :
1. Click Template.
2. Click both Ctrl+F.
3. Find
</style>
4. After that paste the code that you copy just now , before </style>
For template user :
1. Click template ---> Edit HTML.
2. Click both Ctrl+F.
3. Find
</style>
4. After that paste the code that you copy just now , before </style>
5. Preview, kalau tak ada apa apa error SAVE terus.
Have you settled the step above?? We not finished this tuto already , yaaa...
Now, continue this step.
Copy the code below.
<div id="t3"><center><marquee>●Status●</marquee></center></div>
<div id="status">
<span class="icon"> ♥</span>Heyy guys,..<br/>
<div style="float: left;margin-top:5px;">
<span class="time">01:36 P.M</span></div>
<div style="float: right;margin-top:5px;">
<span class="date">04/12/2015</span></div><br>
<br/>
<br/>
<span class="icon"> ♥</span>Editing my blog :D<br/>
<div style="float: left;margin-top:5px;">
<span class="time">12:18 P.M</span></div>
<div style="float: right;margin-top:5px;">
<span class="date">03/12/2015</span></div>
</div>
</div>
For blog skin user :
1. Korang boleh pastekan code tadi di bahagian sidebar blogskin korang. Sebab lain orang , lain blogskin dia kann.. So you have where is the part of your sidebar in blogskin, and dah sure baru korang paste.
2. Now, you can preview. If you have nothing error, click SAVE.
For template user:
1. Click layout.
2. Click Add A Gadget ----> Click HTML/Javascript
3. Paste the code and save.
4. View blog korang menjadi atau tidak.
NOTE :
Orange : type of font. yang ni korang kena ubah ikut font yan korang guna dalam blog. Boleh tengok selalunya di bahagian atas di Edit HTML korang. Dekat2 dengan code text/css. Ade nampak nama font korang guna..
Green : background color, tukar ikut kesesuaian korang.
Blue : background image. Cari yang korang suka okey.
Red : Status, masa dan tarikh. Ini tempat korang update status and tukarlah masa ikut kesesuaian.
P/S: Kalau nak tambah lagi status korang, tambah code di bawah ni dan paste kan selepas <div id="status">
<span class="icon"> ♥</span>STATUS KORANG<br/>
<div style="float: left;margin-top:5px;">
<span class="time">MASA</span></div>
<div style="float: right;margin-top:5px;">
<span class="date">TARIKH</span></div><br>
<br/>
<br/>
Okay, cukuplah tuto untuk kali ni. Agak panjang. Al-maklumlah dah combine sekali tuto for template and blog skin. So mudah untuk korang semua. Terima kasih., Rajin-rajin tingalkan komen kat bawah yea ;)

No comments:
Post a Comment
Feel free to leave your comment here. Thank you. ;)